Note:
It is recommended that you refer to the owner's manual that came with the projector for information and instructions related to your specific projector model.
Owner's manuals for EIKI projectors can be downloaded from the Eiki.com website by going to https://www.eiki.com/owners-manuals/ and searching for a projector model.
Here are a couple of examples on how to change image orientation for a projector.
Example 1
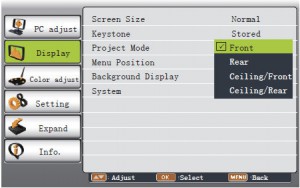 Project Mode
- This function is used to set the project mode.
Press MENU button on the remote control to
display screen menu. Press button to
select Display, then press OK button. - Press button to select Project Mode,
press OK button. - Press button to select the item you want
to set, press OK button.
Front.............. Project to front screen when
projector is front standing.
Rear............... Project to rear screen when
projector is front standing.
Ceiling/Front.. Project to front screen when
projector is in ceiling state.
Ceiling/Rear... Project to rear screen when
projector is in ceiling state.
Example 2
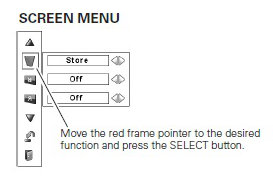
Operate the On-Screen Menu
- Press the MENU button on the projector or the
remote control to display the On-Screen Menu. - Use the Point
 buttons to select a Menu icon. Use
the Point buttons to select an item in the selected
menu. - Press the SELECT button to show the item data. Use
the Point buttons to adjust the values.
To close the On-Screen Menu, press the MENU button
again.
✔Note:
• The selected item is not active until the SELECT button is pressed.
Menu Bar

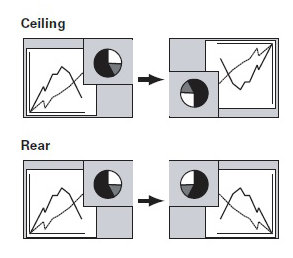
7. Screen Menu
 Used to adjust the size of the image. [Normal/True/Wide/
Full screen/Custom/Keystone/Ceiling/Rear/Reset/Digital
zoom +/–]
After selecting the Screen Menu icon (7), select the
Ceiling or Rear icon from the screen menu.
************
************
![]()
Ceiling
When this function is set to “On,” the picture is top/bottom and
left/right reversed. This function is used to project the image from a
ceiling-mounted projector.
![]()
Rear
When this function is set to “On,” the picture is left/right reversed.
This function is used to project the image from the rear of the
screen.

6. Screen Menu
Used to adjust the size of the image. [Normal/Wide/
Custom/Keystone/Ceiling/Rear/Reset]
After selecting the Screen Menu icon (7), select the
Ceiling or Rear icon from the screen menu.
***********
***********
![]()
Ceiling
When this function is set to “On,” the picture is top/bottom and
left/right reversed. This function is used to project the image from a
ceiling-mounted projector.
![]()
Rear
When this function is set to “On,” the picture is left/right reversed.
This function is used to project the image from the rear of the
screen.